Music Video
Skills Audit
Demo Work
Demo Work
Demo Work
Contents
Demo Work
Contents
> Theoretical exploration of the purpose
and application of research
> Secondary research into
music video genres, codes, conventions,
techniques, and theories
> Primary research with the
client to inform ideas development
> Focus group presentation of ideas for
feedback and review via questionnaire
survey

Moving Demo

Monday 9th May
With my lecture being in the morning today, it meant I could work on other parts of the edit before animating in the afternoon. And so I checked my production schedule in order to see which pieces of work I should complete. My production schedule said the other animated features should be implemented and so that’s what I started on.
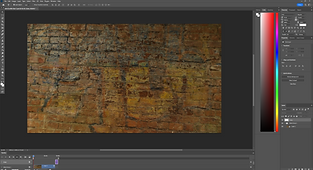
I decided to begin with the animated graffiti in Act 1 Scene 3 as once that is completed that’s basically all the animation for that scene. I began with the easier shot, which is a static shot of the graffiti. In order to make this, I simply used my experience with Photoshop to draw over the original graffiti in order to make it look animated. This wasn’t too hard as I have quite a good knowledge of photoshop, but at first I wasn’t entirely happy with the finished product as I felt it look almost too fake. In order to fix this I lowered the opacity on the drawing so that a little bit of the bricks could be seen through and I felt this improved the look of it a lot.
I then moved onto the other animation in Act 1 Scene 3 where Cody touches the wall and it turns animated. I once again used photoshop for this, but this time used the video feature in order to rotoscope the animation. I had experience with rotoscoping in photoshop from my options project and so I was fairly confident with what I was doing. This took longer than the previous animation as it includes movement. Once I’d created the base movement into photoshop, I exported the video on a green screen into premiere. This allowed me to key out the green and place the animation onto the brick wall. I then copied the animation a couple of times so that it appeared as if Cody was controlling the amount of animation. And then when he takes his hand away from the wall it stays in position. I chose to present it like this as it acts as foreshadowing for Cody’s animated explosion as well as his fully animated room. The different ways that the animated graffiti appear demonstrate the different ways that Cody can control his animation.
Then as I had a little bit of spare time in class I moved onto some more of the green screen work as I’ve been doing a fair amount of that within my animation, so I felt that my green screen skills would come in handy now. I started with Act 3 Scene 2 where the director reveals Cody’s animated room. This was fairly easy as it involved keying out the green screen and replacing it with the drawing. Originally, I experimented with adding a camera shake to the drawing but it just made it look worse and a lot more fake. So instead I implemented some directional blur onto the image in order to add a little bit of movement. Currently I’m happy with how it looks, but I think I may implement a bit more of the blur to show more movement, however I don’t want to overdo it as then it’ll look too forced.
And the last thing I did in lesson was start work on the computer green screen for Act 3 Scene 3. Currently this is a work in progress. I’ve keyed out the green and replaced it with the video of the Doctor talking. I chose to use the Doctor as I felt that was the interview with most impact for Cody. I have started on keyframing the footage to match in time with the zoom out, and I’m simply using the positioning and scaling keyframes. Currently it is in time with the zoom but is still a little rough, so I'm going to improve this over the coming days.
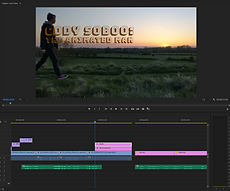
For animating today, I had originally planned to try and get most of the intro animated, being shots 1-5. And I started this by doing Shots 1 and 2. However, this is where it began to fall apart quite quickly. I had originally used 3 keyframes for each of these shots, one of the person entering, them in the middle of the frame and then them exiting. I thought this would be sufficient for Ebsynth to be able to animate. However, after using these three keyframes for each, the result was extremely glitchy and definitely not up to the right standard. So for both of these I then went back and added an extra two keyframes. This definitely improved it, especially for Shot 2, but to be honest I’m still not entirely happy with them, particularly shot 1. Using the multiple keyframes as well as splicing them up in premiere, I was able to get the two shots to a standard I felt was ok enough to give them a pass for today. However, these two shots I am definitely going to revisit as they are nowhere near the look I was going for or the look that the rest of the shots demonstrate.
As these two shots took so long to take, I decided to move onto 2 shorter shots to finish the animating for today. This will allow me to focus more time on shots 3, 4 and 5 at a later date. So the third shot I completed today was the second half for Shot 28. This is when Cody storms out of the classroom. To be honest this was another shot I was slightly hesitant about but I feel actually turned out alright. I used two keyframes for the different sizes of Cody’s body as he moves past the camera and using a blend of these two animations helped to result in a good looking final animation. The hardest part about this one was lining it up in time with the live action footage, and I do think I could improve this a little bit more. I once again experimented with changing the scale of the animation to cover the body but this made it look worse in my opinion. The head does go a little weird towards the end of the animation but while its in motion it’s less noticeable and less of a problem. Overall, I’m happy with this shot but I still feel I could improve the timing with the live action footage a bit better.
And the last shot I completed today was the start of shot 30 where Cody storms past the camera man and boom operator. This was the easiest shot I’ve done, partly as it didn’t involve Ebsynth. When I looked at the frames for it there were only 19, and in fact only about 10 of them actually included Cody, and in fact only his shoulder and arm. And so I felt it would be easier as well as look better to simply rotoscope this in photoshop. I was able to use my experience from my options project as well as my practice earlier today to complete this, and I definitely feel I made the right choice as the shot looked completely fine using this method. I didn’t really have any problems with this shot and overall I’m very happy with it.
Overall, this has been a pretty tough day, especially with the animating. The main take away from today is going to be working on those first 5 shots even more. They are the very start of the piece and need to look the very best so I need to make them the best they can be. Today, I’ve got them to a satisfactory level but later this week and next week when the animation is mainly done, these will be some of the shots I devote the most time to.


Tuesday 10th May
I started my editing today by doing a bit more work on the green screen computer from yesterday. This simply included adjusting the scale keyframes on the doctor’s interview a bit more. I was able to get it a little bit smoother, although I think I’ll continue to do some extra work to just get it even more smooth.
I then started work on one of my special transitions, which is my transition from Act 2 to Act 3. I had planned at the end of Act 2 for the camera to cut off due to Cody’s animated explosion and then cut back in for Act 3. To improve this transition, I wanted to make it seem like the camera was glitching in and out trying to fix itself. To sell this effect, I went on youtube and found a VHS glitching video. I looked through a couple and settled on the one I felt looked good but didn’t seem to over the top. I then imported it into premiere and placed it in the correct place. To sell the effect better I added opacity keyframes so at the beginning it faded in and at the end it faded out. I did the same thing with the sound, making it go from quiet to loud and then back down to quiet. These keyframes made the progression feel slower and more natural, rather than just instantly cutting into the glitch, which may have felt a bit abrupt. But overall, I’m very happy with how the effect turned out and I think it’s likely I won’t change it too much.
And the last piece of editing I did in lesson, was the addition of my title. This was important part of the piece for me and so I wanted to do it justice. At first I simply started doing it in premiere, but then I found all of the fonts within it didn’t feel right for the piece. So I then searched for how to import fonts into premiere. And I made sure to include the website I used within my bibliography. This website showed me that you can use Adobe Creative Cloud to import additional features. And so that’s what I did, I found one I liked and imported it into Premiere. After toggling the colour and shadow, I finished the look of the title. Then once again I used keyframes, but this time on the crop effect. These keyframes revealed the title slowly as Cody walks past it, and it looks exactly how I pictured it, so I’m very happy with the final result.
The four shots I chose to animate today were the ones for Act 1 Scene 5 where Cody is getting ready and setting off for school. The majority of these shots including shots 19, 20 and 21 played out the exact way my shots over the last couple of days have. I drew their keryframes, ran them through Ebsynth and then applied and timed them in premiere. There were a couple of minor errors such as in Shot 19 there was a bit where it was super glitchy which meant I needed to create an extra keyframe but on the whole these shots went fairly smoothly, most likely due to my ongoing Ebsynth experience. Shot 21 was quite interesting as it used two keyframes, one for Cody’s body and one for his reflection in the mirror, but thankfully it worked exactly how I thought it would and the two animations work well in synchrony with one another.


Shot 22 was where I ran into some more major problems. The actual animation wasn’t bad but the amount of glitches were quite a problem. However, over the last couple of days, I’d been thinking of a possible way to remove these and so I tested this theory on this shot. My though was that I could use an opacity mask to mask out the glitches that are far away from the main animation. This wouldn’t get rid of the glitches but could potentially reduce them. And so I tested on this shot, adjusting the mask frame by frame to adapt for the changing glitches. And luckily, it worked like I hoped it would. Although glitching was still there the level of it was heavily reduced. And in fact it worked so well that I went back to shot 2 and did the same thing to reduce the glitching that was quite prevalent in that shot.
Overall, today’s been pretty good for editing. The editing I did in lesson I was happy with and my animation, although a little rough at points will probably only need minor fixes when I come back to tweak them up. But on the whole they are pretty solid animations. I think I’m finally starting to see the piece come together and that’s a really good sign. Currently I’m slightly worried about the animation but as long as I continue with the 4 shots a day that will leave me plenty of time to complete fix ups next week.
Wednesday 11th May
I started my editing today by completing one of my last pieces of animation. This is Cody’s explosion scene where the red animation bursts out of him. I used the same technique that I did for the graffiti. Using photoshop in order to rotoscope over the original footage. This was not too hard as I now have a decent amount of experience with it and the final result turned out quite well. Once I’d completed it in photoshop I imported it into premiere and lined it up with the original footage. I had to adjust the layering in premiere in order for the glitching to affect the red animation as well. Currently, I’m happy with this piece of animation, although I think it’ll improve when the foley is added. At the moment it lacks a slight bit of the impact it needs, but with the clattering foley I recorded, this should provide that impact. My current plan at the moment is to have the majority of visuals completed by the end of this weekend, and then next week I can look at properly adding in all the audio.
And the final piece of work I completed in lesson is one of my favourite new additions. This was the titles for the interviews, that introduce the characters. In order to make this, I used a number of techniques. I originally planned to make the whole thing in photoshop and then import it into premiere. However, I then decided to just create the background in photoshop and then do the words in premiere. I decided to do this because I wanted to be able to control the opacity of the separate parts of the titles. In premiere, I then added the words in addition to the backing rectangle. I already knew I wanted the titles to fade in and out, and so once again I used opacity keyframes to complete that. I started with the backing rectangle. I didn’t want it to become completely solid, so I left the maximum opacity below 100% so that you can still see the character and the background behind the title. I then did the same to the words, except I made sure to turn their opacity all the way up. Once I’d completed the first one for Cody’s interview, I was then able to copy the layers and add them to the other interviews, replacing the words with the different characters. Once I completed this for all the interviews, they were complete. For each of the interview titles, I added a little description below the name. For the Doctor’s one, I made sure to use the correct terminology and so I searched for the correct terminology and discovered the right word was “obstetrician”. I’m extremely happy with these titles and I think they really help to improve the feel of the interviews.
Once again I’ve added a couple of easter eggs within the piece, with most of the interview titles including references to other cartoons. The first one is Cody Soboo which I have previously said is an anagram for Scooby Doo. Then the Doctor’s name is D. Pines which is a reference to Dipper Pines from one of my favourite shows Gravity Falls.
The doctor also works as Mewni Hospital. Mewni is a place within the show Start Vs The Forces of Evil.
And finally the director is called Will Cipher which is an alternate name for Bill Cipher who is the main villain from the show Gravity Falls. These references don’t impact the plot too much but they simply act as fun easter eggs referencing the shows that have influenced and inspired my piece.
Additionally, we looked through some of peoples works in progress today including mine. People said they really liked the look of the animation, and many said they actually liked the glitches that appear, which I was quite surprised by. It was really good to hear some positive feedback on my piece and I’m glad to know that what I am making now people will like once it’s completed.
The first three shots I animated today were the rest of Act 1 Scene 1, being shots 3, 4 and 5. I chose them to do today as I had more time, meaning I could put more work into them. I used my experience with shots 1 and 2 to affect how I created these three shots.
To start with, I added 2 to three extra keyframes on top of the ones I already had to shots 4 and 5 meaning they each used about 4 and 5 keyframes. This was definitely worth it as in premiere I was able to cut between all the different ones, which would reduce a final piece that looked a lot smoother and better animated. The movement was the important part of this scene, and so I chose to make the drawings slightly less detailed, especially with drawing the face. I think if I’d drawn them more detailed Ebsynth would’ve struggled more which would have resulted in weaker movement and a worse animation overall.
Finally with these three shots, I used a lot of the technique that I discovered the other day. This technique is the use of opacity keyframes and mask. I used these quite a lot between these three shots and it really does help to just clean up the animation. Removing the glitches helps the central animation to stand out more, and using the mask helps to reduce the need of even more keyframes. Overall, I’m very happy I thought of this technique and I think it’s likely I’ll continue to use it throughout the rest of this project.
As these three shots took a while to create, I decided to choose a shot I felt would be easier for my fourth shot. And I decided on Shot 38 part 5 which is one of the shots in the compilation near the end, where Cody’s voiceover is heard over the top. This shot wasn’t too hard to create, needing one keyframe and an opacity mask, just to clear up the glitchiness around the face. Once again, I’m pretty happy with this shot and how it turned out.
Overall, I’m actually pretty happy with how today went. My editing in class was really useful, and I’m particularly fond of the interview titles, as well as the little easter eggs I was able to incorporate in them. And the animation today also went pretty well, I was slightly worried about shots 3, 4 and 5 due to my experience with shots 1 and 2. But I think that experience actually helped to improve today’s shots. I feel the more animating I’m doing the better the animations are becoming. And this means when I go back to tweak some of the early ones, I’ll know how to fix them and how to make them look even better.


Thursday 12th May
With today being Thursday, and me wanting to complete the visuals by the weekend, I spent the lesson today finishing up on the last of the smaller adjustments. The first of these was the second fast pan in Act 2 Scene 1, where Cody storms out of the room. As I’ve discussed, I lost one of my actors for this shoot, which meant this second pan had to be slower. But this slow pan meant there was an uncomfortable amount of time after the bully finished talking but before Cody stormed out. I wanted to remove this awkward pause and so decided to quicken the pan so it cuts out that time. I started by speeding up the footage to about 200%, this got it to the length I needed it, but the footage just looked a bit weird. To fix this issue as well as make it seem more realistic I added some directional blur. Thanks to the animated room in Act 3 Scene 2 I knew how to use this tool. Adding in this bit of blur really helped to make it seem more realistic, and I’m a lot happier with this version of the pan over the original.
My second task for the day was creating the pictures for the Doctor’s interviews. These act as background details, and I wanted them to look like a Phd photo. I created these in photoshop as this is where I have the most experience. I took a frame from the original footage, removed the background and added a background and frame, as well as a little title block. This was enough to sell the effect that I was aiming for. Then bringing the final product into Premiere, I placed it into its correct position and slightly adjusted the base colour settings to help it blend it into the original footage. I then completed all these steps for the secondary angle to result in the second portrait. Originally, I had planned to take out the green screen I had used during production and place the image where the green screen had been. However, when I initially tried this, it just made the image look a bit glitchy. So instead, I simply placed my portrait creation over the green screen, without keying out the green. Although this isn’t what I had originally planned, it looks a lot better while still providing the same effect.
My final job for today was simply cleaning up some of the transitions through the piece. For much of the transitions this simply involved slightly adjusting where the footage cut or leaving a bit of space between shots. However for Act 1 Scene 2 and Act 3 Scene 3, I added in some opacity changes. Act 3 Scene 3 was the easier one, as I had a fade in on the doctor’s clip and then a fade out on the students interview. I’ve had quite a lot of experience with using opacity keyframes, especially with my animations and so I was pretty confident with what I was doing. On Act 3 Scene 3 the fades are there to further the effect of flashing back to that footage. And then on Act 1 Scene 2 there’s fades in and out of each of Cody’s childhood photos. These transitions are a lot smoother than the original cuts beforehand as well as giving it a more professional look. I experimented with adding some sort of background behind the images but they all looked out of place, so I’ve decided to stick with the black background. And finally I added a fade out to the end of Act 1 Scene 1 so that it fades into the first image of Act 1 Scene 2. This helps to bridge the gap and all these new transitions really help to improve the pacing of the piece in my opinion.
As I had a little spare time at the end of the lesson, I went over my animation once again and improved some of the opacity masks. This included a couple for Act 1 Scene 1 and the cup drop for Act 1 Scene 3 which turned out to be quite a large task. Overall, adding these opacity masks just created subtle changes for the animation, but in my opinion definitely makes them look a lot smoother and more natural by removing some of the major glitches.
The first two shots I animated today were parts 6 and 7 for shot 38. These were not too hard and with my experience from previous animations I was able to fix most of the minor problems. For part 6 I only used one keyframe, and then in premiere it required a bit of an opacity mask, just to help cover the little glitches that were a bit too obvious.
But I was really surprised with how well part 7 turned out. I completed it using all the methods I’ve been using previously, and with the amount of movement in it, I think it turned out really well. This is most likely due to the fact I used three keyframes. But either way, both these shots I’m quite happy with.
My next two shots were where things started to become a bit more difficult. These were shots 23 and 24 where Cody is walking to the classroom. I knew that between the movement, camera angle and handheld camera that these shots were going to be quite hard. For both shots I used multiple keyframes as Cody’s position on screen changes quite a lot. For shot 23 I was surprised as both keyframes turned out good results. However I hadn’t realised earlier that the blue I had used on my first keyframe was slightly darker than the blue I had used in all the other shots. Luckily, the second keyframe was still good animation, so I was able to use the entirety of that. And with the use of an opacity mask it cleaned up quite well.
Shot 24 was definitely the hardest of today. In total I did three keyframes which gave me varying degrees of success. But as each of them succeeded in separate parts of the shot, I was able to stitch them together for the final result. However, the glitching in shot 24 was quite extreme. But luckily the main body of the animation was fine, so I knew I’d be able to use an opacity mask. And after a little while of work I was able to clean it up to a point where I thought it looked good.
For both shots 23 and 24 I made use of the scale tool to slightly size up the animation. I decided to do this as due to the movement and handheld camera, the animation was not always covering the live action reference. So by sizing up the animations it allowed me to have my actor covered up more of the time, which definitely helps the look of the shots.
Overall, I’m pretty happy with all the work today. My editing at college has been going well and once I start the colour correction and colour grading tomorrow then I’ll be honing in on finishing the visual style of my piece. The animation today I’m mostly happy with and I think will only need a bit of tweaking later on down the line. By Saturday I’ll have all of my animation done, allowing me to start on finalising audio and fine tuning everything else over the course of next week.


Friday 13th May
My last big challenge for creating my visuals was colour correction and colour grading. And these were the tasks that I completed during today’s lesson. I have a bit of experience with colour grading due to my self portrait and music video projects, although these only really covered the basics. So when coming into colour grading today, I felt it best to find some guides to help in my creations.
I felt it best to colour grade chronologically or else I may lose track of which shots I have or haven’t colour graded. And so I began with Act 1 Scene 1 which were my sunset shots. I was pretty happy with how they looked, but I knew they could definitely be better. I scoured youtube for some good tutorials and settled on one, as the result they showed in the video was similar to how I wanted mine to look. And so I followed the tutorial to create my own colour grade. This involved basic colour correction, adjusting the exposure, whites, blacks and more. I then moved onto adjusting hues and curves. Then to finish it off. I duplicated the base layer and fixed an opacity mask around the horizon line so that only the sun was showing. This was a useful coincidence as thanks to my animation, I’m pretty confident with opacity masks. This opacity mask allowed me to complete further colour grading on the difference between the sky and the ground below it, without having to compromise for one or the other. And then the final result was completed. I am very happy with the results and I personally think it looks a lot better. After completing the first shot, I then used the tutorial to create the same colour grade on all the other sunset shots.
Throughout my piece, the sunset shots were the only ones which required a great amount of colour grading. The vast majority of the others only needed basic colour correction or slight colour grading. And since the sunset video had been so helpful, I found a colour correction guide from the same people to follow along with. This allowed me to colour correct the rest of my shots and I’m quite happy with how they’ve all turned out. A lot of my colour grades and corrections were more focused on making the backgrounds look good rather than the actor. For much of the shots the actor is covered with animation, and so I felt making the background stand out more was a bigger priority.
For some of my shots there was a slight bit of noise or grain within the footage. And I wanted to see if I could reduce this. And so once again I found a video to help me correct this. The video introduced me to the VR Denoise which I was able to use to slightly tone down the noise in my footage. Only a very slight amount of the effect was needed, otherwise the footage would become incredibly smooth and look horrendous. But with the slight effect, it really helps to remove the minor blemishes and just improve the footage slightly overall.
Today’s my penultimate day of animation and so I decided to complete one of the chunks of animation that I still had to complete. This started with Shot 37. At first I was slightly hesitant about this shot, as I wasn’t sure how Ebsynth would react to a zoom out. I thought it would be able to handle it fine as it was able to handle handheld shots, and luckily I was correct. I draw several keyframes, but in the end, I didn’t need all of them. Ebsynth was able to handle it very well, and although there’s a slight part of the actor shown occasionally, overall it looks really good.
My next three shots then all comprise shot 38, being the first 3 parts of it. All of these were fairly average Ebsynth shots, with each taking multiple keyframes and for parts 1 and 2 some opacity masks were needed.
Part 2 needed the most opacity masking and that actually took quite a while to get right as the glitching was a lot more obvious on this shot.
But I was surprised by how well Shot 38 part 3 came out. There was no glitching and it covers the actor’s body basically entirely. I think this is likely due to the fact I did 4 keyframes even though it is more minimal movement. But it’s good seeing how this one will turn out, as adding more keyframes is most likely the way I’m going to try to improve some of my shots over the course of next week. So knowing the improvements will work is good.
Overall, I’m very happy with my work today. The colour grading in class was a good way to finish most of the visual editing, and I’m particularly happy with how the sunset shots look now. And the animating today went fairly smoothly and produced good results. I’m looking forward to completing the animation tomorrow as then the structure of my visual look will be complete, allowing me to move onto the audio editing which will then complete the whole piece.


Saturday 14th May
Today was my last day of animating, which meant that I had saved what I felt were the hardest shots. I had chosen to do these shots last as they were ones that included a great deal of movement which I thought would make them a lot harder to animated. But thanks to the experience I’ve gained over the last week, I think I was able to create pretty good results for all of them.
I started with shots 25 and shot 38 part 4. Shot 25 was the easiest of all the shots and simply required several keyframes throughout the whole animation. For all of the shots today I made sure to create more keyframes than I thought necessary as it would give me more to work with.
And this came in particularly useful for shot 38 part 4, which used 6 keyframes. However as this shot was in the bathroom, it meant the actor’s reflection was in the mirror. So I used 3 keyframes to animate the actor’s body and the other 3 keyframes to animate their reflection.
Thanks to the amount of keyframes on these last two shots, it meant they only needed minimal corrections within premiere but the majority of the animation was already fine to use.
This wasn’t the case for the next two shots. The penultimate animation I created was shot 30 part 2 where Cody storms out and creates his animated explosion. I created several keyframes for this but it still needed a decent amount of opacity masking to clean up the glitches within the animation. The masking definitely helped with the animation, although I think it’s likely this will be one of the shots that I’ll come back to and fix up more over the course of next week.
And this left me with my final and hardest shot, shot 26. The difficulty of this shot came from the movement of Cody’s bag. And so I made sure to include keyframes with the most amount of movement so that Ebsynth could understand the movement within the shot. This resulted in a decent animation, although it needed a great deal of opacity masking in order to remove the glitching. However with the masking it does look a lot better, and I would say I’m happy with it, although I think next week I will definitely draw another keyframe for it to help improve it’s smoothness.
Overall, the work today went pretty well and it feels really good to have all of the animation finally completed. With all this work completed, I now only need to complete audio editing and clean-up of the animation. This leaves me still ahead of my production schedule which is good and I think I’m definitely on track to finishing by the deadline next Friday.
